


Taking a decent smartphone photo of one’s own eye may seem like an impossible task, particularly when capturing the area of interest requires the user to look off-camera. However, as ophthalmologists begin conducting more virtual consultations due to the COVID-19 outbreak, patients’ ability to capture anterior segment photos of their eyes may prove more important than ever before. Here are some pointers that providers can share with their patients for taking clear, focused ocular photos using a smartphone device.
Examples of Great and Not-So-Great Eye Photos
GREAT
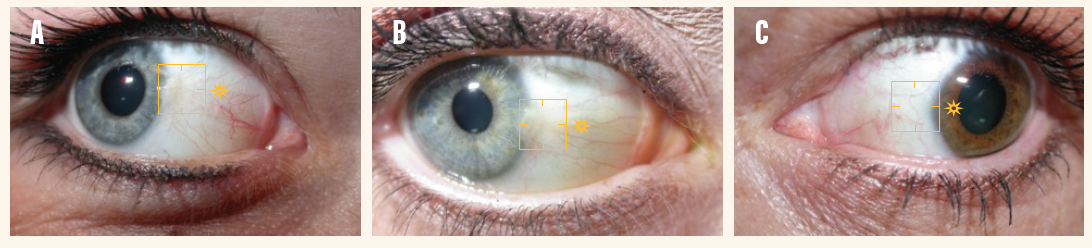
- The area of interest (in this case, the white of the eye) is prominently shown (A).
- The focus is sharp (B).
- All blood vessels are visible in the area of interest (yellow box; C).
NOT SO GREAT

- Too bright: The blood vessels appear washed out (A).
- Too dark: There are visible shadows from the eyelashes (B).
- Out of focus: The eyelashes are in focus, but the eyeball is not (C).
SMARTPHONE-BASED OCULAR PHOTOGRAPHY
Pointers for Capturing Photos
- Recruit a friend to help if possible.
- Ensure that the eye being photographed faces a strong but indirect light source. Avoid direct sunlight—outdoors on a cloudy day is usually an ideal setting.
- When necessary, look to the side so that the area of interest faces straight toward the camera.
- Maintain good focus. To do so:
-
- Hold the camera still and keep the eye as still as possible.
- Do not zoom in. The focus is usually better when the camera is zoomed out.
- Position the camera close to the eye when needed, but ensure that the focus remains sharp.
- Aim the camera lens so that the area of interest is positioned in the center of the screen.
- Tap on the smartphone screen over the area of interest to indicate where the camera should focus.
- For iPhone users, tapping the screen will make a yellow box appear. Keep that yellow box over the area of interest, and then drag the sun icon up or down to adjust the exposure and lighting.
- For Android users, tapping the screen will make a circle appear over the area of focus, with a slider beneath. Drag the slider to adjust the exposure and lighting.
- If pictures appear blurry, ensure that the camera lens on the back of the smartphone device is not dirty.
- Take a few pictures at different angles with different levels of light.
